Sunday, February 25, 2018

New Chicks on the Farm

Two Australorps, two White Plymouth Rocks, two California Whites, two Americaunas, and two Rhode Island Reds. 

I used a sour cream container to make a water holder and used a feeder that I had on hand.  I will be putting them in a bigger home in the next day or two.  They need to stay inside with lights until about 8 weeks because when they are this little, they cannot regulate their own body temperature.


Saturday, February 24, 2018

Veggie Seeds Day 10

Tall and leggy and almost ready to plant.  
These are grean beans.


More Green beans.  
Purple Hulls have not come up yet.  
I may need to direct sow them in the garden. 


Pumpkins


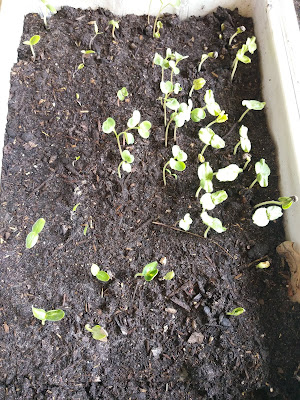
Radishes, cucumbers, okra and some tomatoes.


Flowers


More tomatoes.  
Jalapenos and bell peppers are just starting to come up.  And if you look closely you will see some random cucumber seeds that sprouted from my spent soil from last year.  Bonus!


I've been working hard in the garden, turning soil, building trellises, a bean grove and a pumpkin patch.  

Also bought some baby chicks today from Holloway Farms Feed Supply in Land O'Lakes.  We bought two Black Austrolorps, two Rhode Island Reds, and two White Plymouth Rocks.  I will buy a few more in a couple of weeks.  Waiting for Americaunas to come in and maybe some Marans or Welsummers.  Pictures of my new babies to come!


Tuesday, February 20, 2018

Veggie Seeds Day 6

I'm so surprised how many of my first seeds have come up in such a short time.  This is the first time that has happened to me.  I don't know if the timing was just right as we have been having exceptionally warm weather here in Central Florida, or if the new soil mixture I made is really doing it's job.  Or maybe a combination of both. 

 Green Beans


 More Green Beans

Marigolds and a Bee Mix Flowers


These are hard to see but they are tomatoes, bell peppers and onions


Radishes and tomatoes


So, as you can see, I have done very well sprouting my seeds this season.

I've been tilling the garden beds which is a lot of work and is taking me a lot of time as we are having daytime highs in the 80's already.  I can only work for a few minutes at at time with that stinkin hoe.  It hates me!

Can't wait to get everything in the ground and start my next round of seeds.  

Sunday, February 18, 2018

Grow Perfect Tomatoes Everytime!

Tips for growing the 
Perfect Tomatoes Every time!


There are lots of different varieties of tomatoes.  They come in many sizes, plant types, shapes, colors, disease resistance, and maturity levels.  Some grow on vines and need trellising.  Others grow on a bush and might need staking.  Some need pruning, others do not.  Make sure you read the packaging when purchasing seeds or plants to determine the variety and size of the tomato plants you will be growing.  

1)  Check Soil pH levels - Tomatoes prefer soil slightly on the acidic side.  Preferably around 6.0-6.8.  Test your soil pH.  If it's too low, add lime.  If it's too high, add sulfur.  My sandy Florida soil when amended with chicken manure compost, purchased garden soil, coffee grounds, and wood ash is typically around 6.1 which is perfect for growing most veggies.  No amendments needed.

2)  Till the soil - Tomatoes like loose soil and lots of sun.  Work the soil with a tiller or spade until it's loose to a depth of about 6-8 inches.  Tomatoes like heat and they like the sun so pick a sunny spot in your garden when planting your tomato seeds or seedlings. 

3)  Add fertilizer at planting.  I use chicken manure compost (see my recipe here) or leaf mold compost but you can also use a commercial fertilizer, preferably organic which has the NPK numbers 5-10-10. This refers to (N)itrogen/(P)hosphorous/(P)otassium.  Just mix it right in with soil.

4)  Bury plant up to lowest leaves.  When you are sure the weather is warm enough, Dig a hole approximately 3-4 inches and  saturate with water.  Bury your tomato plants all the way up to their first set of leaves.  Roots will grow all along that stem when buried creating a strong base for your tomato plants. 

5)  Space plants 1-2 feet apart  - Make sure you leave at least a foot or two of space between plants because tomatoes are self pollinators meaning they have male and female parts.  They rely on the wind to pollinate, so leave enough room between plants for this process to take place.  Otherwise, your flowers will not set fruit.


6)  Water your plants at root level - try not to spray the leaves.  This causes all kinds of leaf and fruit setting problems.  Utilize a drip system for your tomatoes if possible.  In the past, I have watered my tomato plants daily (in the morning and evening) here in Florida but this year I am utilizing a drip system.  Typically, tomatoes require about one to two inches of water per week but this can vary depending on your weather patterns.  You can put your finger in the soil near the base of your plant.  If the soil is dry 2 inches down, you need to water.  

7)  Fertilize bi-monthly - Tomatoes need lots of fertilizer. I fertilize my plants at least twice a month with chicken manure compost or leaf mold compost.  There are also lots of good organic commercial fertilizers on the market such as this people and pet safe, Dr. Earth Home Grown Organic, Tomato, Vegetable, and Herb Fertilizer.

 
This year I am growing Beefsteaks, Big Boys, Better Boys, Large Fruited Cherries, and Romas.  

I wish you the best of luck with your garden adventures!

Veggie Seeds Day 4

Some of my seeds have sprouted already on day four.   They must really love my soil mixture.  Radishes,  corn,  and flowers are already sprouted. 


Saturday, February 17, 2018

Sloth Earbud Holder

Here is a little sloth earbud holder I made for a friend for her birthday.  


First Veggie Seed Plantings of the Season

I am huge advocate for recycle, reduce, and re-use and I stayed true to my beliefs with my first seedling plantings of the season.  I found some old refrigerator drawers in my neighbors yard and made my own seed starter soil mix from leaf mold, chicken manure compost, wood ash and spent top soil.  This is only day three and some seedlings have sprouted!  Yay!  Doesn't look like much but these little sprouts are wonderful!


I've planted 5 varieties of tomatoes, okra, corn, radish, onions, pumkins, cucumbers, Marigolds, Purple Hull peas, greenbeans.  And this is only round one.  

My method of seed planting is to make seed tape using newspapers strips, cornstarch mixed with water for paste and spread it on the strips.  Place the seeds on top and plant.  Next week I will do a tutorial on how to do the seed tape.

The bigger seeds such as the beans and corn, I place directly in the dirt.

More updates to come!